I've been doing a lot of reading about DIY lighting mods lately, and in addition to all the great ones on the Strobist, I came across this one, http://blog.tommyimages.com/2007/05/pocket-ringlight.html . While this was a good design and tutorial, I decided to modify some of this design and made a similar ring light, with great results. One of the "hats" as I call them for your to turn your flash into a ring flash cost too much money, and should not. I made this one with materials I already had; all I bought was tape. You could make it with found materials easily, and if you purchase materials, it shouldn't cost more than about $10-15.
Step 1: So you want to mod your own ring light hat? You'll need to obtain the following, which are suggested materials. I found several ways to make/modify certain steps throughout my process, but these are the ones that work best for me:
MATERIALS:
-1 piece of durable plastic - clear* OR etched white (Arcrylic, lexan, or even a thick piece of plastic from a picture frame)
-1 piece of other durable, stiff durable material (another piece of plastic, stiff cardboard, etc., your choice)
-Black Duct Tape (STRONGLY recommend: Black Gorilla tape- holds the strongest)
-Reflective Duct Tape OR some GM spray glue and aluminum foil
-Sand paper (100, 220, 400 grit)
-Either some sort of silvery/reflective material (less possiblility of reflectiveness) OR I used an old darkroom paper safe bag, and cut it into long, 3in strips
-Strip of Velcro
TOOLS:
-Scissors
-Dremel Tool with cutting and polishing wheel and small drill bit *optional: 4in cutting holesaw
-china marker
-Compass for drawing circles
-Clear Matte spray paint coating*
*only need the spray paint if you can only find a clear piece of plastic

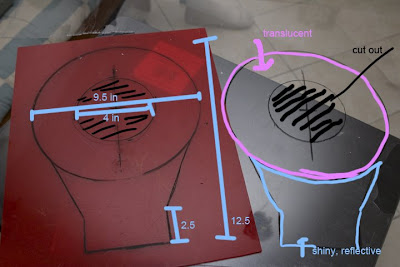
I used a red piece of arcrylic I had lying around and a piece of lexan plastic that was clear. Cut them each to the same size. You can use a compass to make the circle, or something round. I used a weight off a set of dumb bells. Draw the outer circle, evenly measure the center of the circle and put a dot. Measure out 2 in left, right, north, and south of the center and put a mark. Using these marks and a compass (or something circular), draw a circle. I measured out 4 in from the bottom of the circle. I made the opening of what will be the bottom 3.5 in wide, but you may have to change that depending on the size of your flash. It should be fairly universal though.
step 2: Once you measure and draw out to your specificed measurements, its time to cut! If you have a 4 inch hole cut, that makes cutting the center easiest, however, you can drill a series of small holes on the interior circle using your dremel and drill bit, then use a cutting wheel to cut between the drilled holes. I used a holecut. You can get them from a cheap hardware store for about $10 for a kit. If you feel you'll use them in the future, may be worth the investment. Continue to use cutting wheels to cut arond your outline CAREFUL not to crack or break plastic. Lexan is really best, since its most durable for this. A good tip is to cut wider than original, and go back and refine later using a polishing wheel, or sandpaper.

step 3: Once both pieces are cut, lightly sand each with 100 grit paper to ensure tape or glue adhere to plastic, just one side on each. This will be the interior *If you used a clear piece of plastic, use smallest grit,(400) paper to sand the ENTIRE clear piece, front and back using small circular motions. (or if you're me, and have a really nice friend who can sandblast or etch your plastic, that works too, although I have used tested this theory) After its done being sanded, wipe with a wet rag. Using the clear arcrylic coat (Krylon Photo matte finish works best - this stuff is TOUGH and can be hard to sand, so use caution), LIGHTLY AND EVENLY spray the upper ring of the plastic, on both sides. Applying multiple coats is best, but make sure to only apply thin even layers, and wait for each to dry before applying another. The advantage of this is you can control how translucent the ring is. You can tape the bottom part as shown below, because you will be making the bottom portion reflective.

step 4: After everything is nicely sanded you have 2 options for making it reflective: Use the tips from: http://blog.tommyimages.com/2007/05/pocket-ringlight.html to use the reflective cloth.
Or, if you use the old darkroom bag as I did (I used a 11x4 one), cut it into 3 inch wide strips, long enough to go around the edge of your plastic pieces. I used reflective duct tape to cover one side of the bag. OR the messier method, you can use GM spray adhesive, apply a thin coat, and lay aluminum foil on top of it. You will do the same to the piece of plastic that will be the back. Line/ Spray and cover the inside of it with your foil, and also the bottom portion of the front, below the ring.
step 5: Once everything's reflective, take your long strip/cloth, and use the reflective tape to tape the bag to the inside back all the way around. Once that's done, align the front side and back sides, and have a helper hold it up while you use the black Gorilla tape to carefully tape the outside of the front. Keep in mind, you want as little of an edge as possible around the actual ring. Take a piece of your reflective darkroom bag, and use it for the interior of the ring and tape the outside. You'll use a strip of velcro to hold it onto your flash (best to get a long/fat one those cloth "zip" ties that hold together wires)
 Then Tada! you're done! Finished product should look something like:
 It will be stiff at first if u used the foil/darkroom bag, but if you'll just have to carefully work it/smush it to lay flat. Don't worry, it should pop right back out.
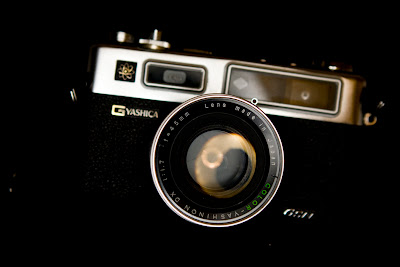
I got pretty good results with it so far as you can see below. Will work really well for macro/product photographer, or close up portraits. I used a dedicated flash sync cord to connect my camera to my flash. Can go wireless too. I think I had the best results when I pumped the flash up 2/3 a stop with my set up. This will vary depending on your flash/camera, and your personal aesthetic.
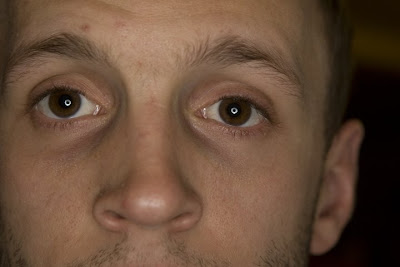
Looking through center hole results in nice "donut" catch lights. Very soft. Nice shadows under chin. For these samples, I had the flash on a tripod, and looked through the center hole of the ring light.


For the following, I put the camera on the tripod, and handheld the flash. (I tried to deliberately leave catch lights in the glasses so you can see where the light is coming from.) Can take it off camera: underneath for horror movie effect:

Above for that old Hollywood glamor, (clearly you should be more glamorous looking for this to work)

Side lighting:
 Hope you enjoy! Be cool to see if anyone else's results out who uses this tutorial, so email me with pics if it works for you!


